If you have ever sat at your desk typing out 200 certificates one by one, you already know the pain. A small typo, a wrong date, a misspelled name and you are starting over. For educators, HR managers, event organizers, and course creators, this problem comes up all the time.
The good news is there is a much simpler way. By using a CSV or Excel file as your data source, you can generate hundreds or even thousands of personalized certificates in minutes. No copy-pasting. No formatting errors. Just clean, professional certificates delivered at scale.
Tools like MixCertificate are built specifically for this. You upload your spreadsheet, pick a template, and get all your certificates ready to generate, send, verify, and track from one place. And you can start for free.

In this guide, you will learn how bulk certificate generation works, how to prepare your data, design your template, and go from a spreadsheet to a folder full of ready-to-send certificates.
Section 1: Why Bulk Certificate Generation Matters
Real-World Use Cases
Bulk certificate generation is not just a nice-to-have. It solves a real operational problem across many industries:
- Online course platforms need to issue completion certificates to every student who finishes a course.
- Corporate training teams must provide proof of compliance training to employees across departments.
- Event organizers want to appreciate speakers, volunteers, and participants with personalized certificates.
- Schools and universities issue certificates for competitions, workshops, and co-curricular achievements.
- NGOs and nonprofits reward community participants or volunteers at scale.
MixCertificate has free templates, no watermark.
In all of these cases, doing it manually simply does not work once numbers grow.
Time and Cost Savings
Here is a quick way to see the difference. If creating one certificate manually takes five minutes, generating 500 would take over 41 hours of straight work. With a bulk tool and a prepared spreadsheet, the same task takes less than 30 minutes including setup.
That time saved goes straight back into work that actually matters.
Consistency and Professionalism at Scale
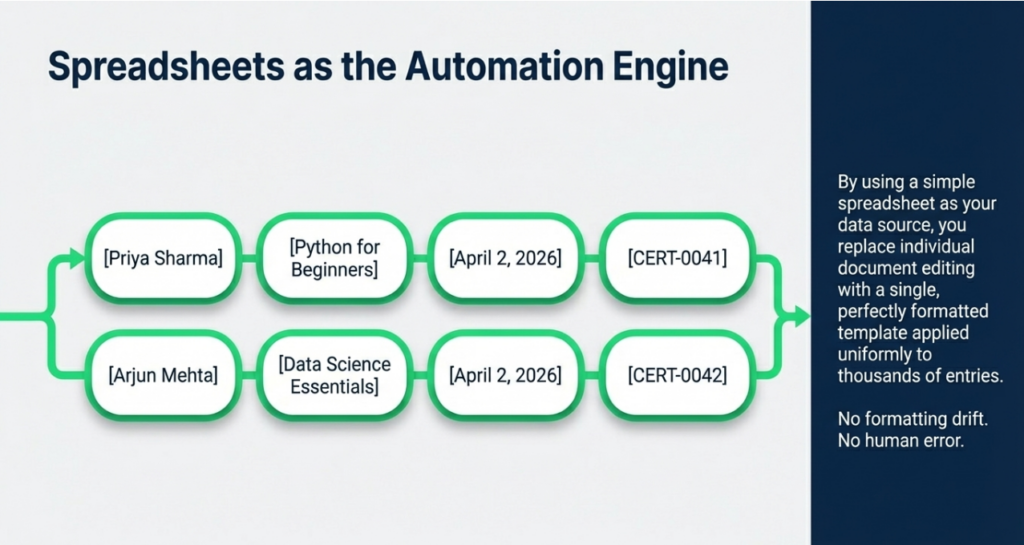
One of the hidden risks of doing things manually is inconsistency. Font sizes drift, alignment shifts, and spacing varies from one document to the next. Bulk generation uses a single template applied uniformly to every entry, so every certificate looks identical and professional whether you issue 10 or 10,000.
Reducing Human Error
Manual data entry invites mistakes. A misspelled name on a certificate reflects poorly on your organization. By pulling data directly from a validated spreadsheet, you cut out the risk of typos at the point of creation.
Section 2: Understanding CSV and Excel as Data Sources
What Is a CSV File and
Why It Works Well
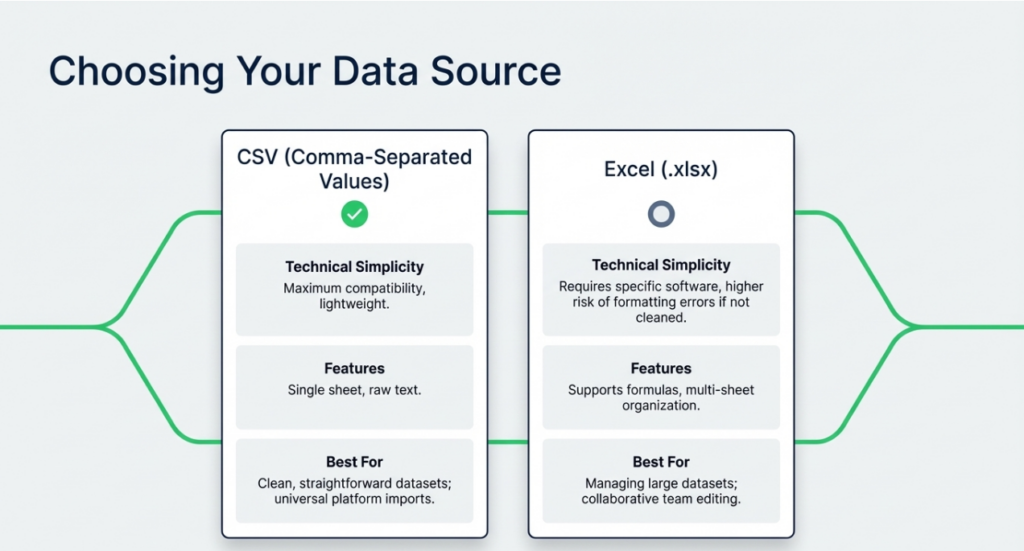
CSV stands for Comma-Separated Values. It is one of the simplest file formats around. Each row is a record, and each column is separated by a comma. Almost every certificate tool supports CSV because it is lightweight and works across all systems without needing special software.
A simple CSV file for certificate genera
tion might look like this:
Name, Course, Date, Certificate ID
Emily Johnson, Python for Beginners, April 2 2026, CERT-0041
Michael Davis, Data Science Essentials, April 2 2026, CERT-0042
That is all you need to get started.
How Excel (.xlsx) Differs and When to Use It
Excel gives you more power than CSV
. You can use formulas to auto-generate certificate IDs, apply formatting to catch errors, and organize multiple cohorts across separate sheets. Most tools support Excel upload directly, though they typically read only the first sheet.
Use CSV when your data is clean
and you want maximum compatibility. Use Excel when you are managing a large dataset with formulas or multiple sheets, or when your team edits the file collaboratively.
Key Columns to Include in Your Spreadsheet
Here is a recommended set of columns to prepare before you generate:
- Full Name: The complete name as it should appear on the certificate.
- Course or Event Name: What the certificate is being issued for.
- Date of Completion: Formatted consistently, for example April 2, 2026.
- Certificate ID: A unique identifier for verification purposes.
- Score or Grade: Optional, but useful for academic certificates.
- Email Address: Needed if you plan to email certificates directly to recipients.
Tips for Cleaning Your Dat
a Before Import
Before uploading your file, spend a few minutes cleaning it. Remove all blank rows. Make sure names are formatted consistently. Format all dates the same way. Remove extra spaces at the start or end of cell values since these often cause fields to render incorrectly on the certificate.
Common Mistakes to Avoid
Special characters like ampersand
s or accented letters can break CSV imports if the file is not saved in UTF-8 encoding. Always save your CSV as UTF-8 from Excel. Avoid merging cells in Excel since most tools read row-by-row and merged cells create blank rows in your export. Your first row should always contain column names.
| Skip the spreadsheet headaches
MixCertificate reads your CSV or Excel file and generates all your certificates in one go. No setup fees. No technical skills needed. |
Section 3: Choosing the Right Certificate Generation Tool
What to Look For in a Good Tool
Not all certificate tools are built the same. Here are the features that actually matter:
- CSV and Excel upload support so you can bring your own data.
- A template editor with dynamic placeholders so each certificate is personalized automatically.
- PDF export which is the standard format for professional certificates.
- Bulk email delivery so certificates go directly to recipients without extra steps.
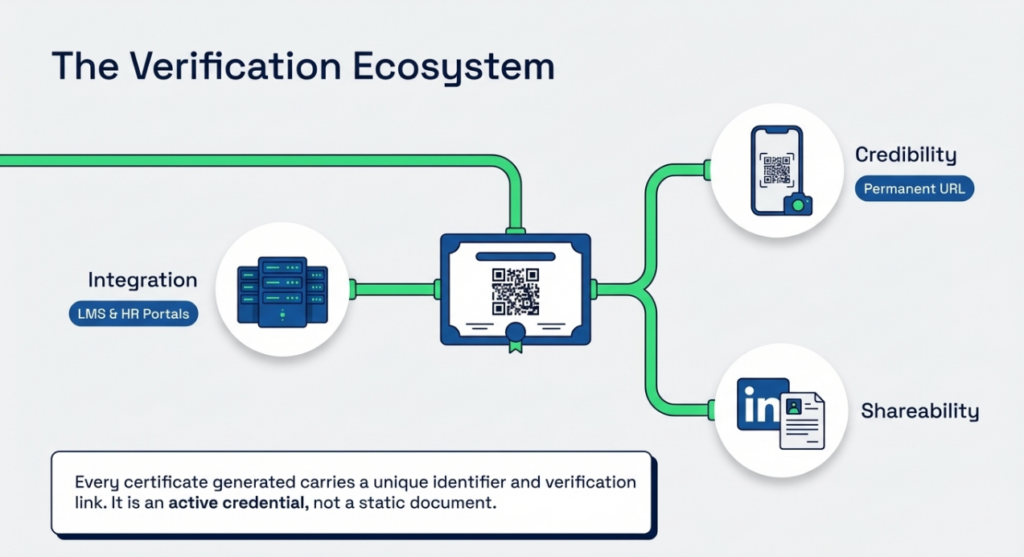
- Verification links or QR codes so recipients can share and prove their credentials.
- A certificate log or dashboard so you can track what was issued, to whom, and when.
Why MixCertificate Is a Strong Choice
MixCertificate was built to make the entire certificate workflow simple and fast. You can generate certificates from your spreadsheet, send them directly to recipients by email, let anyone verify a certificate with a unique link or QR code, and manage your full issuance history from one dashboard.
There is no complicated setup. You do not need any design skills or technical knowledge. You pick a template, upload your data, and you are done.
The forever free plan lets you get started right away with no credit card required. As your volume grows, you can expand your plan to match.
Free vs Paid Plans
MixCertificate offers a free plan that works well for smaller batches and one-off events. When you are ready to handle larger volumes, unlock bulk email delivery, or access advanced verification features, upgrading takes seconds. The time you save with a good tool pays for itself quickly.
Section 4: Designing Your Certificate Template

Essential Elements Every Certificate Should Include
A professional certificate should always contain:
- A clear title, such as Certificate of Completion or Certificate of Achievement
- The recipient’s full name, displayed prominently
- The name of the course, program, or event
- The date of completion or issuance
- The name and signature of the issuing authority
- Your organization’s logo or seal
- A unique certificate ID for authenticity and verification
Optional additions include a QR code for instant digital verification and a short description of what was accomplished.
Design Best Practices
Keep your design clean and readable. Use no more than two fonts, one for headings and one for body text. Make the recipient’s name the most visually prominent element on the page.
For print certificates, design at A4 or US Letter size at 300 DPI. For digital certificates, 72 to 96 DPI is enough and keeps file sizes manageable. Use a landscape orientation since it is the traditional format and looks more formal.
Avoid cluttered backgrounds. A subtle texture or a thin border works well. Make sure there is strong contrast between your text and the background.
Using Placeholders for Dynamic Fields
Every certificate tool uses a placeholder system to know where to insert your spreadsheet data. Common formats include {{Name}}, {Name}, or [Name] depending on the tool. MixCertificate uses a simple drag-and-drop editor where you place fields directly on the template and they fill in automatically from your spreadsheet columns.
Section 5: Step-by-Step Guide to Generating Certificates in Bulk
Here is the complete workflow from start to finish.
- Prepare your spreadsheet. Open Excel or Google Sheets and create your data table with one row per recipient. Include columns for name, course, date, certificate ID, and any other fields your template uses. Clean the data, remove blank rows, and save as CSV with UTF-8 encoding.
- Sign in to MixCertificate. Go to app.mixcertificate.com and create your free account. No credit card needed.
- Choose or design your certificate template. Pick from the built-in template library or upload your own design as a background image. Add placeholder fields where you want recipient data to appear.
- Upload your CSV or Excel file. Import your spreadsheet. MixCertificate reads your column headers and prepares them for mapping.
- Map your columns to template fields. Tell the tool which column matches which placeholder. For example, map your Full Name column to the Name field on your template.
- Preview a sample certificate. Always preview a few entries before running the full batch. Check alignment, text overflow, and date formatting.
- Generate the full batch. Once the preview looks right, run the generation. MixCertificate produces all your certificates in one go.
- Send and share. Download your certificates as a ZIP of PDFs, or use MixCertificate’s built-in email delivery to send each certificate directly to the right recipient. Every certificate gets a unique verification link automatically.
Section 6: Distributing Certificates After Generation
Bulk Email Delivery
MixCertificate includes built-in email delivery. Once your certificates are generated, you can send each one directly to the recipient’s email address from your spreadsheet. Each person gets their own personalized certificate as a PDF attachment, along with a link to view and verify it online.
No need to manually attach files and send emails one by one.
Shareable Verification Links
Every certificate generated through MixCertificate comes with a unique URL that anyone can use to verify it. Recipients can share this link on LinkedIn, add it to their resume, or send it to an employer. You stay in control of the record and can revoke access at any time.
Sharing via LMS or HR Portals
If you run courses through an LMS like Moodle, Teachable, or TalentLMS, check whether it supports certificate integration. Similarly, HR platforms often allow document uploads against employee records. MixCertificate works well alongside these systems.
Organizing Your Certificate Records
MixCertificate keeps a full log of every certificate you have issued, including the recipient name, date, certificate ID, and delivery status. You do not need to manage your own spreadsheet of issued certificates. Everything is in one place.
Section 7: Best Practices and Pro Tips
- Always validate your data first. Run a quick check for missing values, duplicate IDs, and inconsistent date formats before uploading. A few minutes here saves a lot of fixing later.
- Use certificate IDs. Every certificate should carry a unique identifier. MixCertificate can generate these automatically.
- Test with a small batch first. Before running a generation for 500 people, test with 5. Check names, dates, alignment, and file quality. Only scale up once everything looks right.
- Keep your template and source data backed up. Store your certificate template and master CSV in a safe location. If you need to reissue later, you will want these available.
- Consider print and digital versions separately. If certificates will be printed and also shared digitally, you may need two template versions, one at high resolution for print and one optimized for screen.
- Use verification links. Recipients value being able to prove their certificate is real. MixCertificate adds a verification link to every certificate automatically.
Conclusion
Bulk certificate generation is one of those workflows where a small upfront investment in setup pays off every single time you use it. By combining a well-prepared spreadsheet with the right tool, you can go from a list of names to a folder of polished, personalized certificates in far less time than any manual approach allows.
The process is simple: clean your data, design your template, upload your CSV, map your columns, preview, generate, and send. You do not need technical skills or expensive software to do this well.
MixCertificate brings everything together in one place. Generate certificates from your spreadsheet. Send them by email. Let recipients verify and share them. Track everything from a single dashboard. And get started for free.
Frequently Asked Questions
Can I generate certificates with signatures from my spreadsheet?
Yes. You can embed a fixed signature image directly in your template, which is the most common approach. Some advanced tools also support image URLs in the spreadsheet that map to signature fields.
How do I handle special characters like accents or non-Latin scripts?
Save your CSV file in UTF-8 encoding. In Excel, choose CSV UTF-8 (Comma delimited) when saving. MixCertificate handles UTF-8 automatically, so names with accents or non-Latin characters will render correctly.
Can I add QR codes to certificates?
Yes. MixCertificate adds a unique QR code to every certificate automatically. The QR code links to a verification page where anyone can confirm the certificate is genuine.
How many certificates can I generate at once?
The MixCertificate free plan supports smaller batches to get you started. As your volume grows, you can upgrade to handle thousands of certificates in a single run with no limits on issuance or delivery.
What if a recipient loses their certificate?
Because MixCertificate keeps a full log of every certificate issued, you can reissue or resend any certificate from your dashboard at any time. Recipients can also access their verification link permanently.
| Start generating certificates today
Join thousands of educators, trainers, and event organizers who use MixCertificate to save time and look professional. The forever free plan gets you up and running in minutes.
|